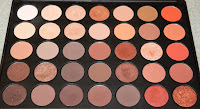
Morphe 35O:
One Palette, Three Looks
 |
| Morphe 35O |
I've been playing around with the palette and I've pulled together three different looks that show the palette's versatility. Keep scrolling to see the looks that I came up with, and how to achieve them:
Quick note; annoyingly Morphe palettes don't include shadow names, so I've named them myself with the rows having numbers and the columns having letters. For example, the top left shadow is called 1A and the bottom right is called 5G.
Look 1
To start this look, I set my concealer with the top left white shadow (1A!) to provide a smooth base.
With the Zoeva 227 Luxe Soft Definer brush, I took the shade 3A into my crease as a transition colour, and then deepened this up with 4G, bringing it down onto the lid, again with the Zoeva 227.
Taking a small flat brush and a concealer, I cut my crease. Whilst this didn't give much of a contrast between the crease colour, it gave a base for the shimmer shade to stick to, and also intensified it.
With the Urban Decay Naked brush, I went over the concealer with the shades 2C and 1D, which gave a beautiful gold shimmer.
I then further deepened the crease with a darker shadow on the outer corner. I took the shades 5C and 4C with the Zoeva 231 Luxe Petit Crease brush, and blended it all together with the original crease
shade 3A again with the Zoeva 227.
To highlight, I used the Bobbi Brown Ultra Fine Eye Liner brush and took the shades 1C and 1D into the inner corner and on the brow bone. Whilst this is an eyeliner brush, I've always found it a bit to big to apply eyeliner in the way I want it. However, it is the perfect size for highlight on the eyes.
Look 2
I applied my first transition shade, 2D, with the Zoeva 227, and then deepened it with 3B and 3C. To intensify the outer corner, I took 5E with the Zoeva 231.
For the lid colour I took the shade 5E on small Lancôme brush. However, the brown shimmer shades didn't have as much pigment or stick to the brush as well as the other shades had, so I had to really swirl my brush in the pan, which ended up causing a lot of fallout.
I lighted the shimmer up in the centre of the lid with the shade 4B, again on the Lancôme brush, and lighter again towards the inner lid with 2C on the Urban Decay Naked brush, creating an ombre effect.
Again in the inner corners, I took 1B and 1C on the Bobbi Brown eyeliner brush.

As always, I applied the transition shade to my crease with the Zoeva 227, you know the drill. This time, I used the shade 2E and then intensified that with 3G on the Urban Decay Naked brush. The denser bristles help to pack the colour on and give a better pay off.
Bringing it higher up towards the brow bone, I took the shades 1G and 2G on the 227, and then deepened the crease with 3D and 5D in the outer corners with the Zoeva 231.
For the centre and inner lid, I took 3F, a gorgeous champagne colour, with the Bobbi Brown eyeliner brush. Because of the denser bristles it gave a very intense colour pay off, but did leave flakes of pigment. To combat this, I took the Zoeva 234 Luxe Smoky Shader brush and patted over the shadow.
Taking the shade 5F on the Zoeva 234 onto the outer lid and blending 2F and 2G into the crease with the 227, the look was complete. For mascara, I applied it to the top lashes quite heavily, but only a tiny bit to the lower lashes to keep the look quite light and to keep the focus on the lid.
Also on my face:
- Pür correcting primer
- Benefit "that gal" brightening face primer
- Mac studio fix fluid foundation in NW10
- The Body Shop Lightening Drops
- Rimmel match perfection concealer in 010 ivory
- Collection pressed powder in 18 ivory
- Bobbi Brown bronzing powder in 1 Natural
- L'Oréal Paris true match highlight in icy glow
- L'Oréal Paris le blush in 120 sandalwood pink
- Benefit gimme brow in shade 5
- Benefit bad gal lash mascara


Comments
Post a Comment